Getting Started with Java
Picking your IDE
Your IDE is the tool you’ll be using to write Java code. For Java, there are quite a few options. The most well-known ones are IntelliJ IDEA, VSCode, Eclipse, and NetBeans.
 IntelliJ
IntelliJ, my IDE of choice, has an amazing code completion system, comparable to VSCode and Visual Studio. It’s built specifically for Java and has a large variety of plugins. These provide additional language support for Kotlin, Scala, Bash, Markdown, etc. IntelliJ is also the editor packaged with Android Studio, so if you plan to be doing any Android or Flutter app development, you’ll likely be using IntelliJ one way or another.
IntelliJ also has integrated version control; support for Gradle, Maven, Ant, and Gant; a built in terminal; Docker integration; breakpoint debugging; real-time collaboration; and more.
Keep in mind that if you’re looking into real-time collaboration, IntelliJ Community Edition (free) only supports up to three collaborators for 30 minutes at a time.
It has support for Windows, MacOS, and Linux.
 Visual Studio Code
Visual Studio Code, commonly referred to as VSCode, is a fairly lightweight all around code editor. It’s very quick and easy to install and is usable almost immediately.
In contrast to many other IDEs, VSCode to get the most out of it, you need to install language support extensions. These allow VSCode to provide syntax highlighting, IntelliSense—their awesome implementation of code completion, debugging tools, and more. For Java, VSCode bundles several into the Extension Pack for Java. This extension pack should give you everything you need to get started writing Java code.
In addition to IntelliSense (or their newer IntelliCode), VSCode also supports breakpoint debugging and built-in Git.
VSCode also has a high level of customization with themes.
It’s available for Windows, MacOS, and Linux.
 Eclipse
Eclipse is a free and open source Java IDE. Like both IDEs mentioned above, Eclipse supports plugins. Eclipse’s code completion is not as extensive as the ones in VSCode and IntelliJ, however, it has a clean and simple UI and supports languages other than Java (like C++). Eclipse is not a lightweight IDE, it can become very resource-heavy at times.
Although Eclipse is a very well known IDE, it’s looks can seem dated at times. If you’re looking for something more modern looking, this may not be the IDE for you.
Eclipse is available on Windows, MacOS, and Linux.
 NetBeans
NetBeans is an IDE developed by Apache. It’s main language (and language it’s written in) is Java. It has automated code-formatting, code completion, parameter suggestions, support for both other languages and plugins, and powerful refactoring tools.
Like Eclipse, NetBeans is open source. It’s available on all operating systems that support java, so Windows, MacOS, Linux, BSD, and more.
Installing the JDK
Now that you have an IDE, you need a Java Development Kit, or JDK. A JDK contains both software to run Java code (a Java Runtime Environment) and software used to write and compile Java code.
At the time of writing, the most recent JDK available is JDK 17.0.1. You may be prompted about a Java SE Subscription, but you don’t need one to code in Java.
The installation and JAVA_HOME instructions are for Windows 10 and 11.
Once you download the JDK for your respective operating system, you’ll be led through the setup wizard.
JAVA_HOME isn't set correctly by default.

Once you’ve installed the JDK, open the command prompt and enter java -version. If this returns the version you’ve installed, you’re good to go. If it errors or returns a different version, press Win+S and type env. This should bring up the System Properties window.
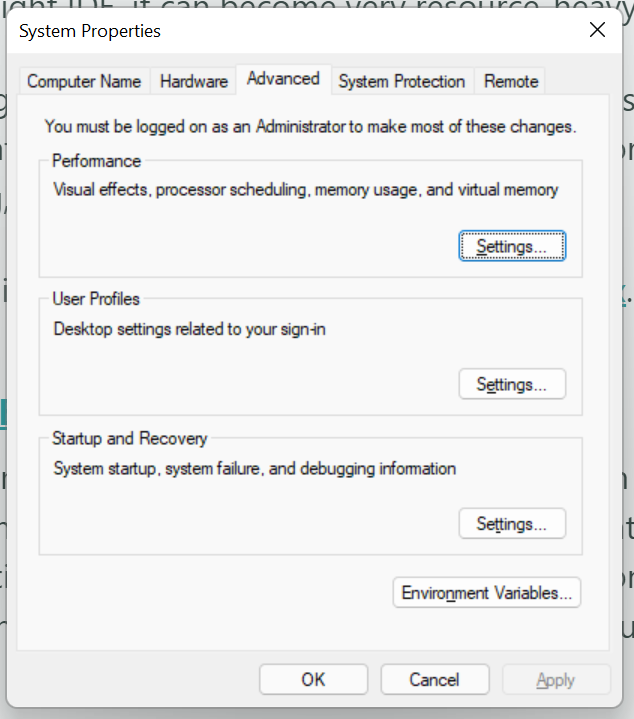
From there, press Environment Variables.... Check the lists presented for JAVA_HOME and make sure it’s set to the path you installed the JDK to.

Creating a Java Project
The Java project instructions are for IntelliJ IDEA, but can be applied to many other IDEs with minimal effort.
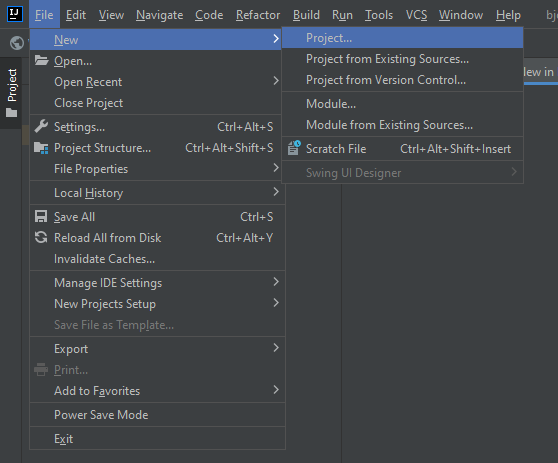
To create a new Java project, navigate to File -> New -> Project
Make sure that the project type is Java and the JDK is the version you installed.

Then, give the project a name and click Finish.
And that’s it! Now you have your first (albeit blank) Java project! Now, let’s populate it!